


In the world of web application development, securing endpoints is a critical task to ensure that only authorized users can access certain resources. One of the most robust ways to handle authentication and authorization in Java Spring applications is by integrating with Keycloak, an open-source identity and access management solution.
Spring Security is a powerful and customizable authentication and access-control framework for the Java Spring ecosystem. However, managing and implementing security policies and authentication mechanisms from scratch can be cumbersome and error-prone. By integrating Keycloak, developers can offload many of these responsibilities to a robust, external system. Keycloak handles user management, roles, and permissions, and provides an easy-to-use interface for administrators.
In this article, we will demonstrate how to seamlessly integrate Keycloak with Spring Boot and secure endpoints based on Role-Based Access Control (RBAC). We’ll guide you through the necessary steps to configure Keycloak, set up roles, and apply security constraints to your application. By the end of this tutorial, you will have authentication and authorization system implemented in your Spring Boot project.
Setting Up Keycloak
Before integrating Keycloak with a Spring Boot application, you need to set up a Keycloak server. Here’s a quick guide to getting started:
- Download and Install Keycloak
Download the latest version of Keycloak from the official website. Extract the downloaded archive and start the server by navigating to the bin directory and executing:
bin/kc.sh start-dev
2024-05-23 06:59:48,625 INFO  [io.quarkus] (main) Keycloak 24.0.4 on JVM (powered by Quarkus 3.8.4) started in 5.096s. Listening on: http://0.0.0.0:8080
- Access the Admin Console
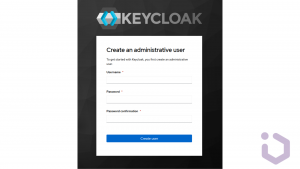
Open a browser and navigate to http://localhost:8080. After creating admin account and logging in you should be redirected to /admin/master/console/.
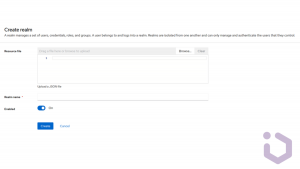
- Create a Realm
A successful login will take us to the console and open up the default Master realm for us. In this scenario we will create a custom realm. Create a new realm by clicking on the “Add Realm” button. After clicking the Create button, a new realm will be created and we’ll be redirected to it. All the operations in the next sections will be performed in this new custom realm.
A realm represents a logical grouping of users, credentials, roles, and configurations. It basicly acts as an isolated environment within the Keycloak server where you can manage users and define security policies independently from other realms. This separation allows for enabling different applications or organizations to have their own distinct security domains within a single Keycloak instance. Realms provide the flexibility to customize authentication and authorization settings to meet the specific needs of different projects or clients.
- Create a Client
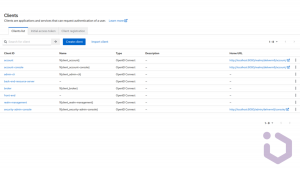
Now we’ll navigate to the Clients page. As we can see in the image below, Keycloak comes with Clients that are already built-in. We still need to add a new client to our application, so we’ll click Create.
A client in Keycloak represents an application or service that requests authentication and authorization from the Keycloak server. Clients are configured within a realm and can have specific roles, credentials, and access policies. They can be web applications, mobile apps, or other types of services that require secure access control. By defining clients, Keycloak can manage how different applications interact with the authentication server, ensuring that each client follows the appropriate security protocols and has the necessary permissions to access protected resources.
- Creating Roles and Users
Define roles and users for your application. Navigate to the Roles and Users sections to add and configure them accordingly.
Integrating Keycloak with Spring Boot
- Add dependencies
We use the Spring Security OAuth2.0 Client to connect to the Keycloak server.
Let’s start by declaring spring-boot-starter-oauth2-client dependency in a Spring Boot application in the pom.xml:
<dependency>
    <groupId>org.springframework.boot</groupId>
        <artifactId>spring-boot-starter-oauth2-client</artifactId>
</dependency>
Also, as we need to use Spring Security with Spring Boot, we must add this dependency:
<dependency>
    <groupId>org.springframework.boot</groupId>
    <artifactId>spring-boot-starter-security</artifactId>
</dependency>
In order to delegate the identification control to a Keycloak server, we’ll use the spring-boot-starter-oauth2-resource-server library. This library facilitates the validation of a JWT token with the Keycloak server. Therefore, let’s include it in our project’s pom.xml file.
<dependency>
    <groupId>org.springframework.boot</groupId>
    <artifactId>spring-boot-starter-oauth2-resource-server</artifactId>
</dependency>
- Configure Keycloak in application.properties
This grant type is suitable for server-to-server communication, where the client application itself is considered the resource owner. It involves exchanging the client’s credentials (client ID and client secret) for an access token.
spring.security.oauth2.client.registration.keycloak.authorization-grant-type=client_credentials
These properties define the client ID and secret that the application will use to authenticate with Keycloak. In this example, the secret is set to placeholder value.
spring.security.oauth2.client.registration.keycloak.client-id=back-end-resource-server

spring.security.oauth2.client.registration.keycloak.client-secret=test-secret
Finally, let’s add the configuration needed for validating JWT token against our Keycloak server:
spring.security.oauth2.client.provider.keycloak.token-uri=${test.keycloak-base-url}/realms/test/protocol/openid-connect/token

spring.security.oauth2.resourceserver.jwt.issuer-uri=${app.keycloak-base-url}/realms/test-realm
By combining these configurations, your Spring Boot application will be able to authenticate itself to Keycloak using the client credentials flow and validate JWTs issued by Keycloak, ensuring secure access to its endpoints.
Now, the Spring Boot application can interact with Keycloak.

- Spring Security configuration
Now, let’s examine the resource server configuration. We need to extract Keycloak-specific information from the JWT. All requests with an Authorization header must include a user’s token with the necessary scope.
In this example CORS is enabled and session management is set to stateless, which is typial for APIs to ensure each request is independently authenticated. We’ve also disabled CSRF protection since our API is stateless.
The application is set up as an OAuth 2 resource server that uses JWT for authentication and jwtAuthenticationConverter is specified to handle the conversion of JWT claims into authorities.
@Bean
public SecurityFilterChain setupOAuth(HttpSecurity http) throws Exception {
          http.cors().and()
         .sessionManagement().sessionCreationPolicy(STATELESS).and()
         .csrf().disable()
  .oauth2ResourceServer().jwt().jwtAuthenticationConverter(getJwtAuthenticationConverter()).and().and()
         .authorizeHttpRequests(authz -> authz
                 .dispatcherTypeMatchers(DispatcherType.ERROR).permitAll()
                 .anyRequest().hasAnyAuthority("SCOPE_back-end-resource-server")
         );
    return http.build();
}
private CompositeJwtAuthenticationConverter getJwtAuthenticationConverter() {
    return new CompositeJwtAuthenticationConverter()
         .extractAuthorities("ROLE_", "realm_access", "roles")
         .extractAuthorities("SCOPE_", "scope");
}
Securing REST API
This specific configuration guarantees that only verified users possessing the correct roles can reach secured content. Suppose there’s a role named ADMIN established, and we aim to restrict access to the list of entities exclusively to users assigned to this role.
@RolesAllowed({Roles.ADMIN})
@GetMapping("/vehicles")
public ResponseEntity<?> getVehicles() {
return vehicleRepository.findAll();
}
One way to obtain the JWT token in a user-friendly way is to integrate Keycloak in the front-end client, e.g. using appropriate Angular libraries, but this will be probably the subject of another post, so let’s take a quick look at initializing KeycloakService (from keycloak-angular library) and move on.
function initializeKeycloak(keycloak: KeycloakService) {
return () =>
     keycloak.init({
         config: {
             url: environment.keycloakUrl,
             realm: 'test',
             clientId: 'front-end',
         },
         initOptions: {
             checkLoginIframe: false,
             scope: 'back-end-resource-server'
         }
     });
}
After successful authentication, we should receive a JWT token with similar structure.
"realm_access": {
"roles": [
     "offline_access",
     "default-roles-test",
     "uma_authorization",
     "ADMIN"
]
},
"scope": "openid profile email back-end-resource-server"
While running a local server, we could use cURL to test our new endpoint:
curl -H "Authorization: Bearer {valid_jwt_token}" http://localhost:4200/api/vehicles
Even if we have the JWT token, the lack of the admin role will result in 403 response.
StatusCode: 403
StatusDescription: Forbidden
Let’s consider a scenario where the user logged in to the admin account:
StatusCode: 200
StatusDescription: OK
As we can see using Keycloak Role-Based Access Control (RBAC) in web applications offers several advantages. Firstly, it provides a robust and scalable solution for managing access to resources based on user roles and permissions. By defining roles within Keycloak and assigning them to users or groups, administrators can easily control who can access specific functionalities or data in the application. This granular access control enhances security by ensuring that only authorized users can perform certain actions or view sensitive information.
Moreover, Keycloak RBAC simplifies the management of access control policies across multiple applications or microservices. Centralizing user roles and permissions in Keycloak eliminates the need to implement and maintain separate authorization mechanisms in each application. This centralization streamlines administration tasks, reduces development overhead, and ensures consistency in access control policies across the entire ecosystem of applications.
In summary, leveraging Keycloak RBAC in web applications brings about enhanced security, modularity, centralization, and adaptability in access control management. These benefits contribute to building more secure, maintainable, and scalable web applications while simplifying administration tasks and ensuring consistent access control policies across the application ecosystem.