


Step-by-Step Guide to Enabling Multi-Factor Authentication (MFA) in Keycloak

In today’s digital age, the importance of securing online resources has never been greater. As these threats continue to evolve, the traditional method of relying on passwords has proven insufficient in protecting sensitive information. This escalation underscored the necessity for more sophisticated security measures, leading to the widespread adoption of Multi-Factor-Authentication (MFA). In this blog post, we will explore still growing online threats and how MFA serves as a defense mechanism for our applications.
What is MFA?
Multi-Factor Authentication (MFA) enhances the security of your applications by requiring users to provide multiple forms of identification before granting access. Of course, tools like Keycloak support MFA and allow administrators to configure it with ease. This guide offers a detailed, step-by-step procedure to enable MFA in Keycloak, ensuring that your user authentication processes are more secure.
MFA is designed to protect users against the vulnerabilities associated with single-factor authentication, where a user only needs to provide one form of authentication, typically a password. MFA adds layers of security by requiring users to present multiple pieces of evidence (factors) that confirm their identity.
Authentication factor user in MFA are typically categorized into three types:
- Knowledge Factors (something you know)
- Passwords
- PINs
- Security questions
- Possession Factors (something you have)
- OTP (One-Time Password) generated by an authenticator app
- SMS codes
- Email codes
- Hardware tokens
- Inherence Factors (something you are)
- Biometric verification (facial recognition, fingerprint etc.)

The first step is always initial authentication, when the user enters username and password (so called knowledge factor). After the initial authentication, the user is prompted to provide a second form of authentication and this could be an OTP sent to the phone, a biometric scan, or another form of possession/inherence factor. If both factors are successfully verified, the user is granted access to the application. Now let’s take a look at a few example types of authentication and their pros/cons.
Email-based OTP
In this method, a temporary code is sent to the user’s registered email address, which they must enter to complete the login process. Users receive the OTP directly in the email and it does not require to install or configure any additional apps. But we should remember that email accounts can be compromised, and intercepted emails could be a significant security risk.
SMS-based OTP
Receiving an OTP via SMS is straightforward and familiar to most users, also requiring no additional app installation. It should work on any mobile phone, making it accessible to a broader range of users. But they can be also vulnerable to interception and SIM swapping attacks, making them less secure compared to other methods. SMS delivery can also be delayed or even fail due to network issues. We’ll take a closer look at its pros and cons in the next post which covers custom authenticator development.
Push notifications
Push notifications involve sending a real-time alert to a user’s registered mobile device, asking them to approve or deny an authentication attempt. Users are instantly notified of any login attempts, allowing them to quickly respond to any unauthorized access attempts. They also do not need to enter a one-time password (OTP), which simplified the authentication process. This method of course requires an active internet connection. But remember that infected devices could potentially compromise the security of this feature and that users basically need to be educated about recognizing legitimate push notifications to avoid accidental approvals of attack attempts.
OTP via Authenticator Apps
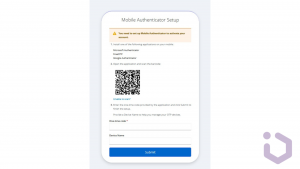
OTPs generated by authenticators like Google are highly secure as they are time-based and difficult to predict. They can generate OTPs without an internet connection, making them reliable even when users are offline. In this case, users need to have access to their mobile device to generate the OTP and initial setup very often requires scanning a QR code and configuring authenticator app, which might be challenging for non-technical users.

How to configure OTP (via mobile authenticator) in Keycloak
Now we can go to the Keycloak console and try to set up some basic OTP in our realm. Before attempting to enable MFA in Keycloak, ensure you have a running instance of Keycloak, administrative access to the server, and a basic understanding of realm, client, user management concepts from previous posts.
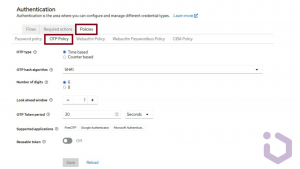
Step 1: OTP Policy
From the side menu select the realm where you want to enable MFA. In the realm settings, navigate to the Authentication section and select the OTP Policy tab. Configure settings according to your security requirements. You can select default values that are provided by the server.
Step 2: Required actions
In the Authentication settings, go to the Required Actions tab. Now you can activate OTP as default action for every new user.
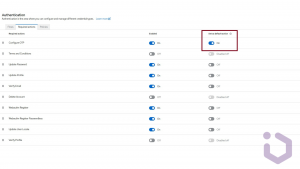
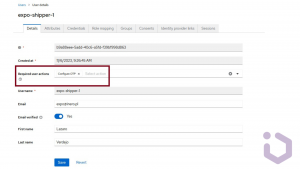
Therefore, we have already configured MFA and each newly registered user will have to use it. Of course, this configuration could be modified through in-the-app account settings so that users only use MFA if they specifically request it.
As we can see, MFA is a powerful tool for protecting sensitive information and enhancing the security of web applications. By requiring multiple forms of verification, it makes it significantly harder for unauthorized users to access accounts and systems, mitigating risks associated with password-only authentication. Implementing this mechanism is surely helping organizations comply with regulations and protect against still-evolving web threats.
In the next article, we will take a closer look at a custom SMS authenticator for Keycloak, exploring its pros and cons.