
One of the biggest benefits Keycloak provides in almost every use case is Single Sign-On (SSO). This greatly enhances user management and simplifies authentication processes within company applications and provides an effective solution to address security challenges. Today, we’ll explore how it works and how to set up an example integration.
SSO (Single Sign-On)
SSO is a protocol that allows users to authenticate and gain access to multiple applications using a single set of credentials. This approach is highly convenient, as it eliminates the need for users to remember multiple passwords or log in repeatedly. Beyond this, SSO enhances security by reducing risks associated with weak, reused, or lost passwords when properly implemented.
The center of an SSO system is the identity provider (IdP), which works like a central authentication server. When users log into their first application, they are redirected to the IdP, where they provide their credentials. Upon successful authentication, the IdP starts an SSO session and generates an encrypted access token, which the application uses to confirm the user’s identity.
Once the SSO session is active, the user can access other trusted applications without needing to log in again. When a second application requires authentication, it communicates with the IdP, which verifies the user’s active session and issues another access token, granting seamless access without re-entering credentials.
Modern IAM solutions facilitate SSO implementation across various applications, often using open standards like OAuth 2.0 and OpenID Connect (OIDC). These standards enable authentication not only for internal applications but also for those relying on external identity providers. Additionally, many SSO systems support social login, allowing users to authenticate with their existing credentials from platforms such as Google, Facebook, or Twitter, further simplifying access across different services.
Types of SSO
When implementing and managing Single Sign-On (SSO), it’s crucial to understand the various protocols and standards that enable its functionality. Among the most widely used are Security Assertion Markup Language (SAML) and OpenID Connect (OIDC). Keycloak supports these two protocols, making them the main point of our discussion. However, it’s worth noting that other protocols, such as Kerberos, also play a role in certain SSO scenarios.
Security Access Markup Language (SAML)
SAML is an XML-based standard designed to encode and exchange identity information between applications. It has become a cornerstone for SSO, enabling web applications to validate authentication requests securely. SAML 2.0, the most widely adopted version, is specifically optimized for browser environments, allowing user information to be securely passed through web browsers. It is basically more verbose and less efficient in terms of data processing compared to modern standards. That is why SAML is best suited for legacy and enterprise web applications, especially those within organizations.
OpenID Connect (OIDC)
OIDC is an extension of OAuth 2.0, which adds information about users and enables SSO. It uses JSON and RESTful APIs for data exchange, making it lightweight, fast and easy to integrate, especially for mobile and cloud-native environments. It is particularly useful for scenarios involving social login (e.g., Google, Facebook) and external APIs in general. That would be the best choice in scenarios where applications require flexible, scalable authentication with token-based security.
Multiple benefits of SSO
The key benefits of single sign-on are:
- SSO helps reduce the need of remembering multiple usernames and password consolidating authentication into a single set of credentials.
- By minimizing the number of password resets and login issues, it reduces the need for IT support, resulting in cost savings.
- It eliminates interruptions caused by multiple logins or password management, allowing users to quickly access the resources they need and remain focused on their tasks. It makes the login process faster and enables one-click logout across multiple applications.
- With all user data in one centralized location, administrators can easily manage and adjust user access permissions across the network, ensuring better control.
- By consolidating login data, SSO reduces the risks associated with poor password management. Admins can disable accounts more easily when necessary, improving overall security.
In general, SSO improves user experience, boosts productivity, strengthens security, and simplifies administrative tasks by centralizing authentication and making access management easier to do.
Potential drawbacks
- Single Point of Failure (SPOF)
If the SSO provider experiences downtime or is compromised, users may lose access to multiple applications simultaneously.
- Implementation might be complex
Setting up and maintaining an SSO system can be technically challenging, especially in environments with diverse applications and protocols. Not all applications may support SSO out of the box, requiring custom integrations.
- Scalability concerns
In high-traffic environments, the SSO system must handle significant loads, which may require additional resources and careful planning for further integrations.
SSO with Keycloak and Spring
Now we will cover how to set up a simple SSO mechanism using Spring Security, keycloak-angular library and Keycloak as an identity provider. Using Keycloak here is driven by several factors. It uses the well-established OpenID Connect standard, ensuring broad compatibility. It also stands out for its large number of ready-made examples for integrating both front-end and back-end applications. It also offers significant flexibility through Java-based extensions, allowing for easy customization.
To run SSO demo we can go through preparing the authorization server, resource server and two different client applications. When a user attempts to access a resource from one of the client applications, he should be redirected to the authorization server for claiming a token. Keycloak will manage the login process and once the user is logged into the first client app, if he accesses the second client app through the same browser, he won’t need to log in again, as the SSO session remains active. This time we’ll use an OIDC client that supports OAuth2 and Authorization Code Flow to handle the authentication process between the endpoints.
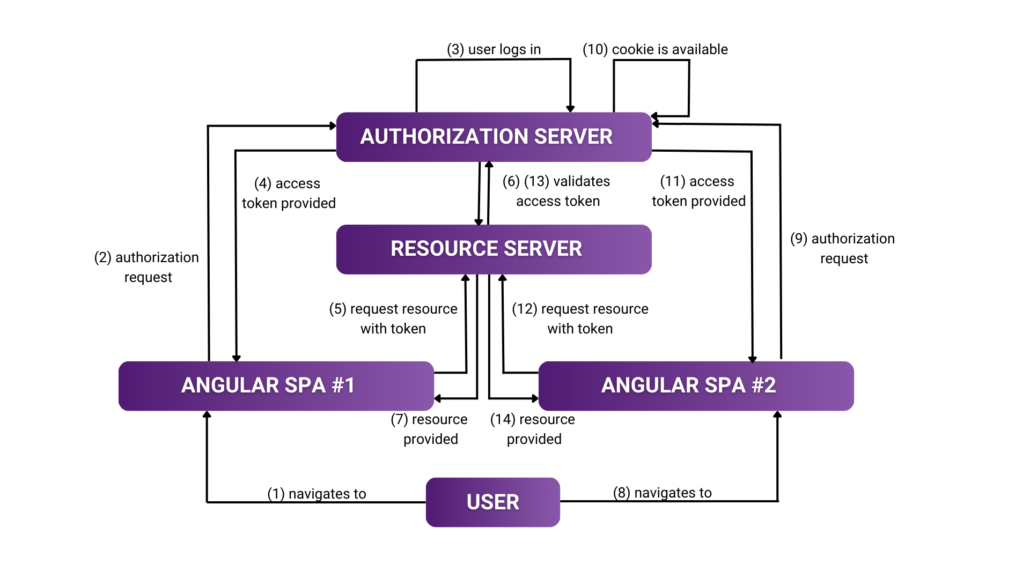
Authorization server
For Identity Provider / Authorization server purposes we can use the docker image that contains the latest release of Keycloak. By deploying KC through a docker-compose file, we can quickly set up and configure the environment (also database) without the overhead of manual installation. This simple docker-compose setup would define two services for Keycloak and a PostgreSQL database.
x-keycloak: &keycloak
build: keycloak
ports:
– “8080:8080”
depends_on:
– db-postgres-keycloak
x-common-variables: &common-variables
KC_BOOTSTRAP_ADMIN_USERNAME: admin
KC_BOOTSTRAP_ADMIN_PASSWORD: admin
KC_HOSTNAME_STRICT: “false”
KC_HTTP_RELATIVE_PATH: /auth
KC_HTTP_ENABLED: ‘true’
KC_LOG_LEVEL: “INFO,io.quarkus.http.access-log:DEBUG”
KC_DB: postgres
KC_DB_URL_HOST: db-postgres-keycloak
KC_DB_USERNAME: keycloak
KC_DB_PASSWORD: password
KC_DB_SCHEMA: public
QUARKUS_HTTP_ACCESS_LOG_ENABLED: ‘true’
services:
keycloak:
<<: *keycloak
environment:
<<: *common-variables
profiles: [“example”]
command: start –optimized
db-postgres-keycloak:
profiles: [“example”]
image: postgres:15
environment:
POSTGRES_USER: keycloak
POSTGRES_PASSWORD: password
POSTGRES_DB: keycloak
After starting the containers, we can log in to the admin console (here on http://localhost:8080). But before we proceed with realm clients configurations, let’s take a moment to explore the Realm settings -> Sessions tab.
SSO session configuration
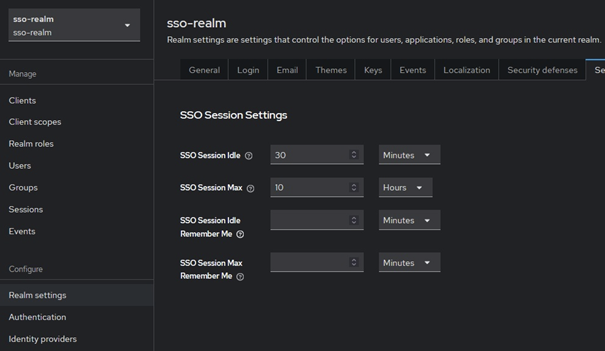
When configuring a new realm, we can also adjust session management settings to balance security and user experience. These settings determine how long users remain authenticated and the conditions under which they must re-authenticate. Below we are describing the most important ones:
SSO Session Idle – this setting controls how long a user can remain idle before their session is considered expired. If a user is inactive for the specified time, they will need to re-authenticate the next time he interact with the application. It resets when clients send refresh token requests.
SSO Session Max – this defines the maximum duration for which a session remains valid, regardless of user activity. Once the session exceeds this lifetime, the user will be logged out and prompted to log in again.
SSO Session Idle Remember Me and SSO Session Max Remember Me – similar to SSO Session parameters but specific to situations when the user has the Remember Me option enabled.
Client Session Idle and Client Session Max – these parameters should specify a shorter timeout than general SSO settings. They describe the maximum validity period for a refresh token and can be overridden for individual clients in client settings.
Resource server
One of the realm clients will represent our resource server, which serves a dual role as both a client of Keycloak and the backend for two different applications participating in the described flow. The process of integrating a Spring Boot application with Keycloak is pretty similar to what we described in one of the previous posts. (https://inero-software.com/securing-java-spring-endpoints-with-keycloak/).
Therefore, we won’t focus on the Java application itself here. Resource server configured this way will expose a sample endpoint accessible only to users authenticated within the realm.
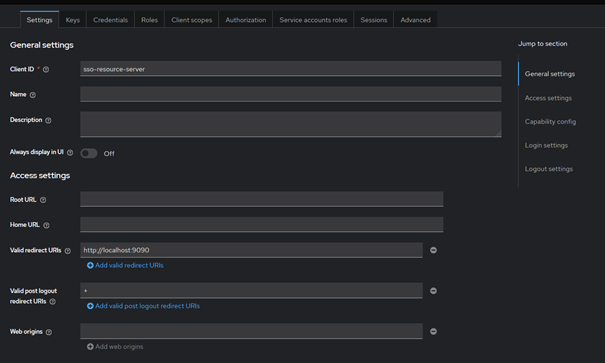
The resource server needs to manage resources within the realm, which is why we enable the Authorization checkbox in Keycloak. Basically, this setting is intended for resource servers that require access to various endpoints such as the Token Endpoint.
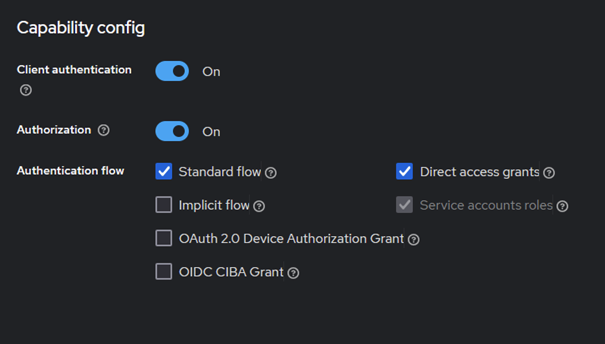
For this setup, the client is configured as confidential, with a secret, which must be shared between both the Keycloak server and the application itself. You can generate it within the Admin Console, and then include it in the application.properties file of the Spring application for secure communication.
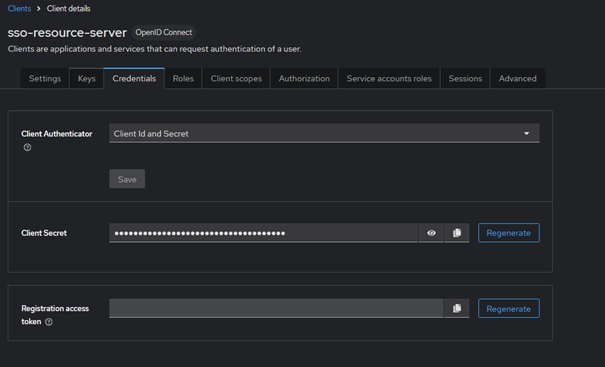
You can leave the remaining form fields as default.
Frontend clients
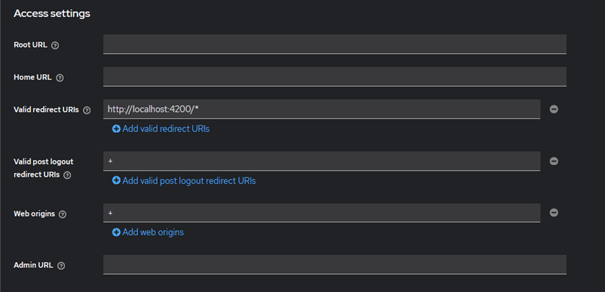
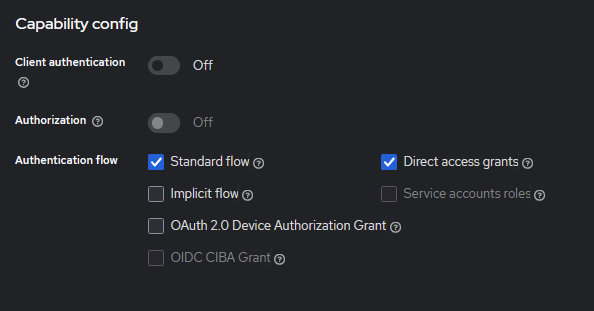
The configuration for frontend clients is pretty similar to the previous one. However, there are some differences to note. For browser based clients, we do not want to set them as confidential. “Authorization” option is also not necessary here. A key point to focus on is the proper configuration of redirect URIs and Web Origins. They can typically be the same. This ensures that Keycloak correctly recognizes the allowed origins from which the frontend application can make requests.
However, it is advisable not to get used to relying on wildcards (*) in redirect URIs. The most recent OAuth 2.1 specification requires that URIs must be compared using exact string matching.
To authenticate a user and show Keycloak’s login page within our Angular project, we will utilize an Injection Token.
function initializeKeycloak(keycloak: KeycloakService) {
return () =>
     keycloak.init({
         config: {
             url: environment.keycloakUrl,
             realm: 'sso-realm',
             clientId: 'sso-app-1',
         },
         initOptions: {
             checkLoginIframe: false,
             scope: 'sso-resource-server'
         }
     });
}
Above function takes as an argument a KeycloakService which is an object from keycloak-angular library so that we can use it in the body of a function to configure it by providing URL to the server, realm name and application’s client id which was created a step before. Next we need to register this function in the app.module.ts file, as a provider:
providers: [
     {
     provide: APP_INITIALIZER,
     useFactory: initializeKeycloak,
     multi: true,
     deps: [KeycloakService],
     },
],
Next step would be to create a Guard that will protect routes in an application. The library that we’re using is already providing a preconfigured, abstract KeycloakAuthGuard class from which we will extend ours. Then we need to override the isAccessAllowed method.
public async isAccessAllowed(
      route: ActivatedRouteSnapshot,
      state: RouterStateSnapshot

) {

     // Force the user to log in if currently unauthenticated.
    if (!this.authenticated) {
    await this.keycloak.login({
    redirectUri: window.location.origin + '/#/' + state.url
     });

     }
    // Get the roles required from the route.
    const requiredRoles = route.data['roles'];

   // Allow the user to proceed if no additional roles are required to access the route.
   if (!(requiredRoles instanceof Array) || requiredRoles.length === 0) {
   return true;
   }

   // Allow the user to proceed if all the required roles are present.
  return requiredRoles.every((role) => this.roles.includes(role));
}
Next, we have to assign the AuthGuard to the specified routes in the routing module. With all these keycloak-angular library components properly configured, we should be able to redirect the user to the Keycloak login page and after successful authentication, the user would be able to access the secured resources.
Testing and summary
To test the SSO functionality, you can run the resource server (Spring application) and both browser-based clients. Once everything is up and running, open a browser and log in to one of the frontend clients. Then, open a new tab or window and navigate to the second Angular application. After clicking the login button, you should be redirected to the app directly and have access to the secured endpoint.
Now you can see how using Keycloak’s built-in features simplified managing access permissions. By leveraging it as an Identity Provider, we can set up a system where users only need to log in once to access various connected applications. By centralizing user credentials we can also enhance both security and user experience, and for example, reduce the risk of password-related vulnerabilities.

