
Local deployment of Large Language Models (LLMs) is becoming increasingly popular among developers, tech enthusiasts, and professionals in industries like insurance and transport. Unlike cloud-based APIs, local LLM deployment offers greater privacy, offline accessibility, and complete control over resource optimization and inference performance.
Running models like Llama 2 or Mistral directly on your hardware means your data stays on your machine — ideal for privacy-sensitive tasks such as processing insurance documents or working with proprietary transport data. There are no recurring API costs, and the performance depends solely on your system. Whether you’re building a custom chatbot, agent, an AI-powered code assistant, or using AI to analyse documents offline, local deployment empowers you to experiment and innovate without relying on external services.
In this guide, we’ll explore two powerful tools that make this possible: Ollama and LM Studio. We’ll walk through installation, usage, and customization, helping you pick the best option for your goals.
Getting Started with Ollama (CLI Tool)
Ollama is a lightweight, open-source command-line tool for running LLMs locally. It acts as a model manager and runtime, making it easy to download and execute open-source models (like Llama 2, Mistral, CodeLlama, etc.) on your machine. Ollama is available for macOS, Linux, and Windows, and it includes a local REST API for integration into applications.
1. Install Ollama on Your System: Download the installer for your platform from the official Ollama website or use a package manager.
On Windows, download the OllamaSetup.exe from the website and run it. On Linux, you can install Ollama with one command:
curl -fsSL https://ollama.com/install.sh | sh
After installation, open a terminal/command prompt and verify it’s installed by checking the version:
ollama --version
This should display the installed Ollama version, confirming it’s ready to use, e.g.:
ollama version is 0.6.2
2. Download an LLM Model (“Pull” a Model): Ollama has a built-in model library. You can search their catalog on the website or simply pull a known model by name. For example, to download the 7B parameter Llama 2 chat model, run:
ollama pull llama2:7b-chat
This command fetches the model weights to your machine (it may take a while, as models are multiple GBs in size). You only need to pull a model once; afterward it’s stored locally. You can list all downloaded models with ollama list if needed.
3. Run the Model Locally: Once downloaded, you can execute the model with the ollama run command. This will launch an interactive session where you can enter prompts and get responses. For example:
ollama run llama2:7b-chat >>> What is the capital city of Poland?
After running the above, Ollama will load the model and you’ll see an >>> prompt. You can then type your questions or instructions. The model (here Llama 2 7B chat) will generate a response to each prompt. For instance, you might ask “What is the capital of France?” and get an answer like “Paris is the capital of France.” printed in the terminal. Internally, the first run may take a bit to initialize, but subsequent prompts are answered interactively. Tip: You can also pass a one-off prompt directly in the command, e.g. ollama run llama2:7b “What is the capital city of Poland?“ will output a single response and return to the shell.
You can also start Ollama as a background server with ollama serve. This enables the REST API on localhost:11434, which developers can use to integrate the model into apps via HTTP calls. You can ask the model by sending POST request, e.g.:
curl http://localhost:11434/api/generate -d '{
  "model": "llama2:7b-chat",
  "prompt": "What is the capital city of Poland?"
}'
The API returns newline-separated JSON objects, chunk by chunk, as the model generates the response:
{
    "model": "llama2:7b-chat",
    "created_at": "2025-04-02T15:19:17.1569954Z",

    "response": "The",
    "done": false
}
{
    "model": "llama2:7b-chat",
    "created_at": "2025-04-02T15:19:17.268992Z",
    "response": " capital",
    "done": false
}
{
    "model": "llama2:7b-chat",
    "created_at": "2025-04-02T15:19:17.3796491Z",
    "response": " city",
    "done": false
}
...
{
    "model": "llama2:7b-chat",
    "created_at": "2025-04-02T15:19:21.3106413Z",
    "response": " Warszawa",
    "done": false
}
{
    "model": "llama2:7b-chat",
    "created_at": "2025-04-02T15:19:21.4619772Z",
    "response": ").",
    "done": false
}
{
    "model": "llama2:7b-chat",
    "created_at": "2025-04-02T15:19:21.6296267Z",
    "response": "",
    "done": true,
    "done_reason": "stop",
    "total_duration": 5337417000,
    "load_duration": 8625100,
    "prompt_eval_count": 28,
    "prompt_eval_duration": 854952300,
    "eval_count": 15,
    "eval_duration": 4472807400
}
If you set stream: false, the response is a single JSON object:
curl http://localhost:11434/api/generate -d '{
  "model": "llama2:7b-chat",
  "prompt": "What is the capital city of Poland?",
  "stream": false
}
You can also set a number of model parameters such as temperature by adding field options:
curl http://localhost:11434/api/generate -d '{
  "model": "llama2:7b-chat",
  "prompt": "What is the capital city of Poland?",
  "options": {
 "temperature": 0.2
  }
  "stream": false
}'
4. Customize Models: Ollama supports a Dockerfile-like syntax called a Modelfile to create custom LLM variants. These let you:
- Start from an existing model (like llama3)
- Add custom system prompts
- Inject user-defined data (e.g., instructions, context)
- Set model parameters, like temperature
Here is the simple example how you can create your custom assistant for processing insurance documents:
FROM llama2:7b-chat

PARAMETER temperature 0.7

SYSTEM """

You are an assistant that extracts insurance-related information from a given input text.

You must extract and return only the following fields:
- policy_number
- insurance_period
- insured (company or person name)
- nip (tax identification number)
- address (of the insured)

Return the output as a **clean JSON object** -- not as a string, not inside quotes, and without any commentary. If a field is missing, use "Not found".
Example output format:
{
  "policy_number": "...",
  "insurance_period": "...",
  "insured": "...",
  "nip": "...",
  "address": "..."
}

"""
TEMPLATE """
{{ .System }}
Input:
{{ .Prompt }}
Response:
""" Lorem ipsum dolor sit amet, consectetur adipiscing elit. Ut elit tellus, luctus nec ullamcorper mattis, pulvinar dapibus leo.
To use Makefile, save it in a directory, e.g. insurance-assistant and create the custom model:
ollama create insurance-assistant -f insurance-assitant/Modelfile
Then, you can use your model by providing the proper model name in a request:
 curl http://localhost:11434/api/generate -d '{
  "model": "insurance-extractor",
  "prompt": "",
  "stream": false
}'
Ollama is purely CLI-based, so there’s no graphical interface. However, this makes it powerful for automation – you can pipe input/output, log responses to files, or call the Ollama API from code. In summary, with just a few commands, you have a privacy-protecting LLM running on your PC, ready to answer questions or assist in coding, all without any internet connection needed.
Getting Started with LM Studio (Desktop App)
LM Studio is a user-friendly desktop application that lets you download and run local LLMs via a graphical interface. It’s cross-platform (Windows, macOS, Linux) and ideal for beginners who prefer not to use the command line. With LM Studio, you can chat with models in a nice UI, manage model downloads, and even run a local server to use the model in other apps.
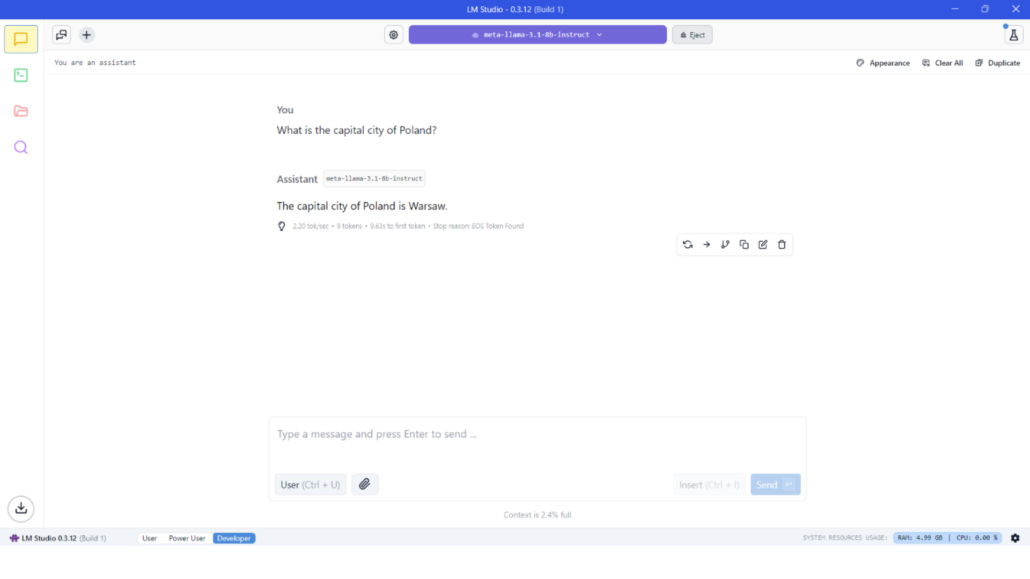
1. Install and Launch LM Studio: Download the installer for your OS from the LM Studio website and install it. After installation, launch the LM Studio app. The first time you open it, you’ll be prompted to download an AI model. You can choose from a list of popular open-source models. For example, you might select a smaller model like “Mistral 7B” or an instruction-tuned Llama2 variant to start.
2. Run Your First Chat: Once the model is downloaded, LM Studio will load it into memory. You can then start a new chat session in the app. The interface typically has a text box where you can enter your prompt or question, and the model’s response will appear in the chat window. Simply type a query (for example: “What’s the capital of France?” or “Explain quantum physics simply.”) and hit Enter. The AI’s answer will be displayed as the “Assistant” reply in the chat. LM Studio conveniently shows the generation metrics:
- number of input and output tokens,
- tokens per second – you can see how fast the model is generating text,
- context occupancy,
- system resources usage (RAM and processor usage).
3. Explore the Features: The LM Studio GUI provides additional features accessible to both beginners and advanced users:
- Model Library: A “Discover Models” or catalog section where you can download new models or update existing ones. You’re not limited to one model – you can have multiple models stored and switch between them. This means you have a wide selection: from small 3B parameter models for speed, up to 70B models if your system can handle them.
- Chat Interface: The main chat screen (as shown above) is where you interact with the model. Each new prompt you enter is answered by the model in a conversational format. You can have multi-turn dialogues, just like chatting with ChatGPT. There’s no need to manage a prompt history manually – the app keeps the conversation context.
- Advanced Settings: On the side panel, LM Studio offers configuration knobs for those who want more control. You can set a system prompt (a role or instruction that guides the AI’s behavior globally), adjust generation settings like temperature (creativity vs. consistency) and top-p or top-k sampling for controlling randomness, max tokens for responses, etc. These options let you fine-tune how the model responds without writing any code. For instance, you could set a system instruction like “You are a helpful coding assistant,”. This is a friendly way to customize behavior, though it’s not as extensive as programmatic control in a CLI tool.

Advanced settings – simple example of AI assistant for processing insurance documents
- Local API Server: For developers, LM Studio includes a “Local LLM Server” mode. Just switch to Developer tab, choose the model, and toggle Start button. It enables an API endpoint on localhost that mimics the OpenAI API, allowing other programs to send requests to your local model. This is powerful if you want to integrate the local LLM into your own applications (for example, connecting a chatbot UI or using the model for AI features in an IDE) while still benefiting from privacy and not relying on external services.
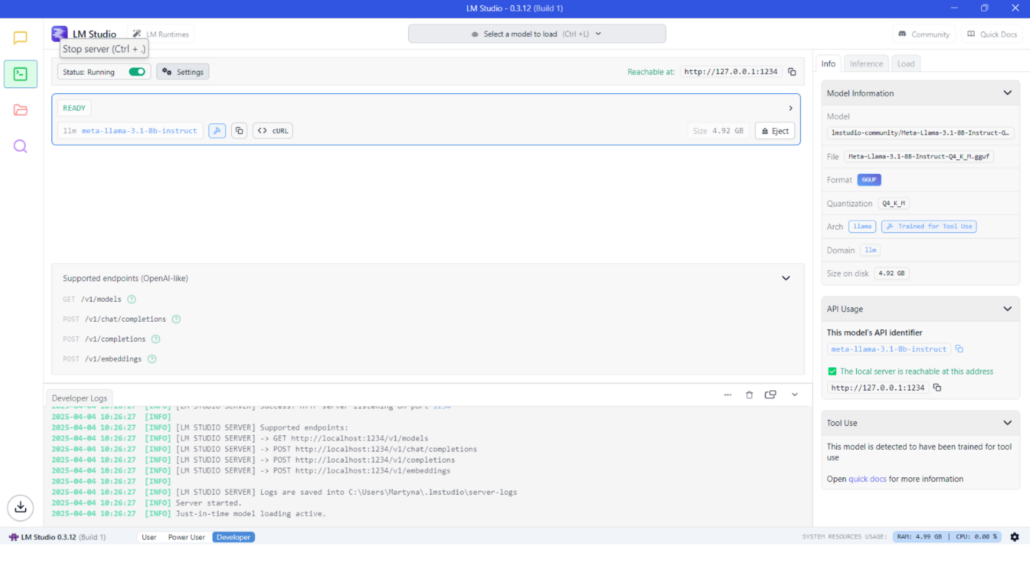
Developer tab – you can enable local LLM server hosting your customized LLM.
Using LM Studio is as simple as chatGPT – type and get answers – but entirely running on your hardware. The user-friendly interface lowers the barrier to entry, since you don’t need to use the terminal or remember commands. You get immediate, interactive AI responses, with buttons and menus to manage everything.
Ollama vs. LM Studio: Tool Comparison
Both Ollama and LM Studio let you run LLMs locally, but they cater to slightly different audiences and use-cases. Here’s a comparison of key aspects to help you understand their differences:
- Interface & Ease of Use: LM Studio provides a polished graphical user interface, which makes it extremely approachable for beginners. It’s point-and-click with an integrated chat window, so no technical knowledge is required to get started. Ollama, on the other hand, is a command-line interface (CLI) tool (with an optional REST API). It offers a lot of power and flexibility but does require comfort with the terminal to use effectively. Beginners might find Ollama’s learning curve steeper, whereas LM Studio feels more plug-and-play.
- Supported Models: Both tools support a wide range of open-source LLMs. LM Studio can load any model in GGUF format (the standard for llama.cpp), meaning models like Llama 2 (7B, 13B, 70B), Mistral, Vicuna, Alpaca, CodeLlama, etc., as long as you have the hardware for them
- Use Cases Suited: Because of the above differences, LM Studio is excellent for users who want a personal ChatGPT-like assistant on their PC with minimal setup. It’s great for interactive Q&A, brainstorming, or casual use – you launch it when you need it, type queries, get answers. Ollama is ideal for developers or those who want to incorporate LLMs into projects or workflows. If you plan to experiment with prompts in scripts, fine-tune model behaviors, or build an app (like a chatbot, a coding assistant integration, etc.) that calls a local model, Ollama’s CLI and API give you that flexibility.
Conclusion and Recommendations
Deploying LLMs locally has opened up a world of possibilities for developers and enthusiasts. We’ve discussed Ollama and LM Studio – two excellent tools that make local AI accessible. To recap some guidance on choosing between them:
- Choose LM Studio if you want a plug-and-play AI chat experience with a friendly GUI. It’s perfect for beginners or those who prefer not to tinker with command lines. You get quick setup, easy model downloads, and a nice chat interface for interactions. This might be best for someone who just wants an “offline ChatGPT” for personal use, note-taking, or idea generation without fussing over configurations. It’s also a convenient way to demo LLM capabilities to non-technical users (since it feels like a normal app).
- Choose Ollama if you want more control, automation, or integration. Developers and power users will appreciate its flexibility – you can script it, run it headless on a server, integrate the local LLM into your own apps via the API, and fine-tune model behavior with Modelfiles . If you’re comfortable with a terminal and want to customize how the AI works (beyond what a GUI allows), Ollama is a better fit. It’s also lightweight if you intend to run background AI services continuously.
Finally, remember that the LLM itself (the model you choose) is as important as the tool. Spend time finding a model that suits your task – whether it’s a concise summarizer or a creative storyteller – and fits your hardware. Both Ollama and LM Studio make it easy to swap models, so you’re not locked in. The ecosystem of open-source models is growing rapidly, which means running a powerful AI on your own device is only getting easier and more common.
In summary, deploying LLMs locally with these tools gives you the best of both worlds: AI capabilities similar to cloud services, but with privacy, control, and zero ongoing cost. Whether you go with a command-line power tool like Ollama or a user-friendly app like LM Studio, you’ll be joining the cutting edge of local AI development. Happy experimenting, and enjoy your new personal AI running right on your machine!