Google Workspace (GW) is a great tool for corporate collaboration that simplifies document flow between employees and allows you to use smart automation tricks to make your teamwork more agile and efficient. It also allows you to combine other Google services such as natural language processing and understanding, chatbots, Google Vision, built-in google databases and many others thus allowing to improve collaboration for corporate teams. In this post, I will show you how one of Google Workspace tricks, Google Apps Script, can be helpful in your corporate document creation and processing. We’re going to have a look behind the scenes of creating Header and Footer which is triggered with a single menu-item click! (not (CTRL+C, CTRL+V) x2 ). And to spice things up we’re going to write code in TypeScript in local IDE and then compile it to Apps Script code.
But before we do that, let’s just quickly explain what Apps Script is.
Basically speaking Apps Script is a Google Platform to develop business applications integrated with Google Workspace applications like Gmail, GDocs, etc. The code itself is a plain Javascript that has access to libraries that allows you to access the Google resources you need. (like a spreadsheet (GSheets) or the document (GDocs))
If you feel like you need to learn more about this then check The official AppScript overview page.
Environment Setup
Online Editor (JavaScript)
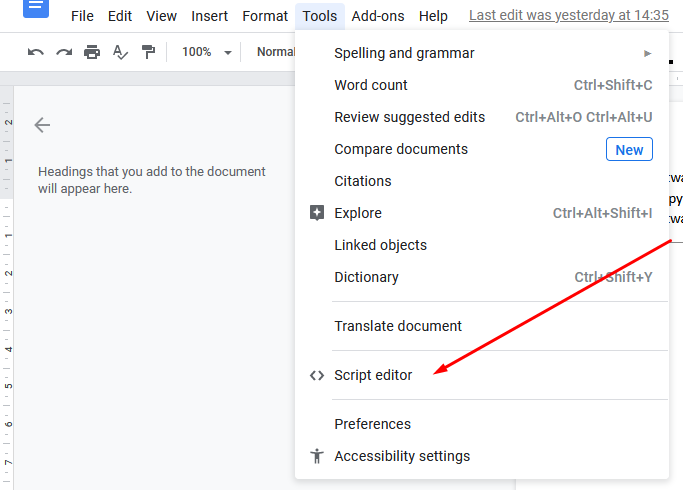
As mentioned before, we are going to develop the application in local IDE with Typescript, but if you think that you don’t need it (you really don’t have to). Then you can just open the online editor in your Google application like this:

Once you do that, you can just start writing code that you want, the main AppScript file should already be created. Please note that if you choose this approach you’ll be writing JavaScript code (just skip the types if you want to follow my code from the next chapters)
Local IDE (TypeScript/JavaScript)
To write TypeScript code you’ll need (guess what) a local IDE. I am using IntelliJ, but you can go with VS Code and it also should do the job just fine. Unfortunately, this is not enough to make this work. You’ll also need NodeJs and a package manager (I used npm), which is going to help us install type definitions for TypeScript and clasp.
Install commands:
npm install -g @google/clasp
npm i -S @types/google-apps-script
Clasp (Command Line Apps Script Projects) is what’s going to connect our code with the documents stored on our Google Drive. I won’t go into the details of using this command line. Just the basics that I had to use myself. Of course, if you need more then here’s the Apps Script clasp small guide.
After you install clasp you have to log in to your Google account (so that you can access your GDrive). After typing the command below you’ll be taken to the google login website where you’ll follow the instructions.
clasp login
Now you’re logged in and ready for action! 🙂 And by action, I mean creating a project. For that we’re going to use the following command:
clasp create
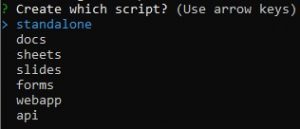
Which is going to ask you for the type of application that you want:

In today’s use-case, we’re going to select the docs.
After you do that your project should be ready to work on.
Few things to keep in mind:
- This is going to create a document in your GDrive.
- The document’s name is going to be the same as the name of the folder in which you created the project with clasp create.
- You probably will have to create file Code.ts yourself.

The Goal
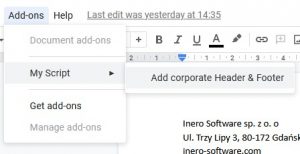
Okay, so the actual thing that we want to achieve is the header footer, which can be triggered with a single click, like this:

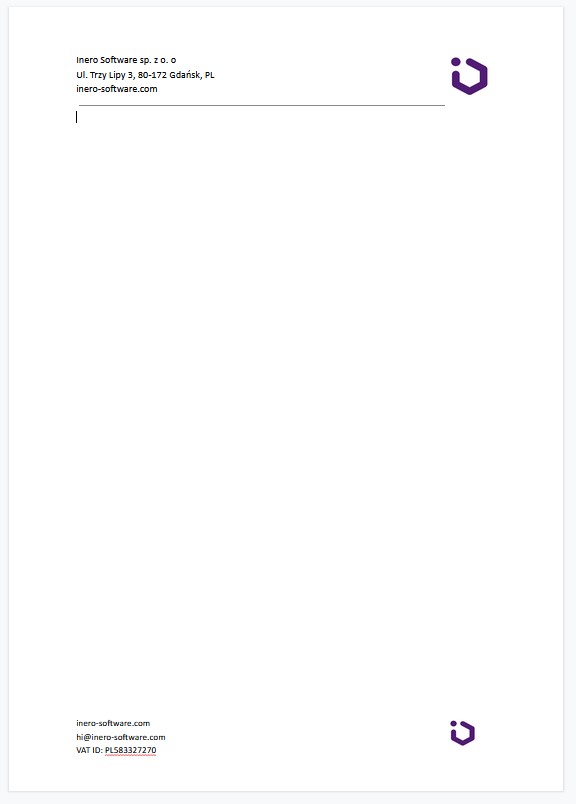
And the click would result in this:


The Code
Now you’re probably ready to get to the actual coding. You can open the previously created Code.ts file and write some functions using google types definitions we installed before.
Again I am not going to go into details of every single interface and object defined in Apps Script, just the ones that were useful for this use case.
Style
First thing that we’re going to do is to define the text style:
function getTextStyle(): any {
const style = {};
style[DocumentApp.Attribute.BOLD] = false;
style[DocumentApp.Attribute.FONT_FAMILY] = 'Calibri';

return style;
}
This function is going to be used in both header and footer to provide the appropriate font-weight and font-family.
Logo
To display the company logo we’re going to create a separate function, which takes in a document paragraph to which the logo is going to be connected and desired size as arguments.
function addLogo(parentParagraph: GoogleAppsScript.Document.Paragraph, size: number): void {
const logoBlob = DriveApp.getFilesByName('Inero_Software_logo.png').next().getBlob();
parentParagraph.addPositionedImage(logoBlob)
.setLeftOffset(400)
.setHeight(size)
.setWidth(size);
}
As you can see here, we are using DriveApp, which allows us to get any file stored on our Google Drive, in this case, we are getting a logo (I don’t have to mention that it is on my GDrive, right?)
The setLeftOffset function is pushing the logo to it’s righteous place. (like you know, the image is on the right side not left… nevermind)
Header
First step of header and footer functions is checking whether the header already exists. (If somebody already has something in the header, adding more stuff through Apps Script could result in unwanted text/image setting.)
function addHeader(): void {

let header = DocumentApp.getActiveDocument().getHeader();
if (!header) {
header = DocumentApp.getActiveDocument().addHeader();
}
…
}
The logic here is pretty straightforward. We take our GoogleDoc using DocumentApp.getActiveDocument() and get the Header of the document. If it doesn’t exist then create it.
Easy.
But you may be wondering, what’s the DocumentApp . It is a class/service which allows you to open google docs stored on your GDrive (it doesn’t have to be the active one).
Next step is to put the content inside our header:
function addHeader(): void {

...

const style = getTextStyle();
style[DocumentApp.Attribute.FONT_SIZE] = 11;

let firstParagraph = header.appendParagraph('Inero Software sp. z o. o').setAttributes(style);
header.appendParagraph('Ul. Trzy Lipy 3, 80-172 Gdańsk, PL').setAttributes(style);
header.appendParagraph('inero-software.com').setAttributes(style);

addLogo(firstParagraph, 60);

header.appendHorizontalRule();
}
You can see what’s happening here:
- We set font-size
- We create 3 paragraphs, assign them the text and style
- We save the first paragraph to a variable, so we can use it as a reference point for inserting the logo
- At last, but not least, we append the horizontal rule which gives a nice touch to our header
The footer function is almost exactly the same, so I won’t be describing it. But here’s the code since for quick overview:
function addFooter(): void {

let footer = DocumentApp.getActiveDocument().getFooter();
if (!footer) {
footer = DocumentApp.getActiveDocument().addFooter();
}

const style = getTextStyle();
style[DocumentApp.Attribute.FONT_SIZE] = 10;

let firstParagraph = footer.appendParagraph('inero-software.com').setAttributes(style);
footer.appendParagraph('hi@sandbox-www.devel.inero.com.pl').setAttributes(style);
footer.appendParagraph('VAT ID: PL583327270').setAttributes(style);

addLogo(firstParagraph, 40);
}
Is that it!?
No, we still need to create the aforementioned menu, right? Here’s the function:
function onOpen(e): void {
DocumentApp.getUi().createAddonMenu()
.addItem('Add corporate Header & Footer', 'addFooterAndHeader')
.addToUi();
}
Here DocumentApp allows us to access the user interface and add what we want to it. And what we want is the menuItem. addItem() function takes in the text which will be displayed in the UI and the function to trigger when clicked.
Function onOpen is one of the simple triggers , and onOpen is triggered whenever a document is opened (so every time you click F5 the menuItem is being added).
Here’s the function which is executed when you click the menuItem:
function addFooterAndHeader(): void {
addHeader();
addFooter();
}
No explaining needed here…
Is that it!?
Yes, but only when it comes to code. One more thing left to do is to push the code to our Google Drive document. (you can skip it if you’re using the online editor)
It’s an easy thing to do, all you have to do is to go to your project directory, open your CLI, and type…
clasp push
And that’s it! You can go to your google drive account, find your file and start the script through your own menu item. You will have to agree that you trust this add-on a few times, and that is a question only you can answer… Do you trust yourself? (or how google puts it – do you trust this unknown developer)

Summary
 I’d say that the whole operation was relatively easy to do. You can see how fast you can create a custom add-on that simplifies (automates) your back-office tasks (especially if you don’t care about type-checking and use the online editor, not the local setup). It’s enough if you check the docs to see how certain classes work and you’re good to go!
But what else could you do besides a simple header & footer?
That may sound kind of corny but – whatever your imagination tells you. You could attach custom footers to your emails depending on who you write to, or maybe integrate google cloud search with your databases so that you could reference your data inside your emails within seconds. Seriously, a lot of possibilities.
Google Workspace, similarly to Microsoft SharePoint, provides great tools for back-office automation. Using GW you can integrate various services that Google offers and combine them including such services as natural language processing, machine learning, App Scripts, Google Vision and many others and adjust them to your corporate requirements.
What’s your next (first?) Apps Script project?
If it’s not a secret then share it with me on twitter @IgorStencel .
(If it is a secret though, we can chat about it privately through LinkedIn, don’t be a stranger!)
In need of some real help with creating your dream Google Workspace Add-on?
Contact us at hi@inero-software.com
Inero Software provides knowledge and expertise on how to successfully use cutting edge technologies and data to shape corporate digital products of the future.
In the blog post section you will find other articles about IT systems and more!


